Tuesday, February 22, 2011

chocolate caramel kiss surprise cookies


So you are going on vacation in 10 days and you have to wear a bathing suit.  I should be cutting carbs and outside running.  Instead I am standing in my kitchen stuffing double chocolate chip cookie dough with caramel hershey kisses.   Curse this raging sweet tooth of mine.  I am always drawn to the holiday version of candies.  I bought the Valentine M&Ms and a bag of the caramel hershey kisses.  I had no idea what I was going to do with them but, I could not resist.  Holiday candies and sprinkles seem to jump into my cart.  Valentines day has passed and I still had a bag of kisses.   I was thinking of a thumbprint style cookie but, I love gooey caramel so I decided to hide the kiss inside the cookie so it melts into the dough.  I had a bit of trouble getting the kiss in the middle of the dough ball but, after various attempts I got the hang of it toward the end.  Flouring my hands helped get the dough balls rolled with the kiss in the center. These are soft chocolate cookies with a gooey caramel center. 

chocolate caramel kiss surprise cookies
source: sweetflours

Ingredients
  • 2 cups all-purpose flour
  • 2/3 cup baking cocoa
  • 1 teaspoon baking soda
  • 1/2 teaspoon salt
  • 1 cup (2 sticks) butter (room temperature)
  • 2/3 cup granulated sugar
  • 2/3 cup packed brown sugar
  • 1 teaspoon vanilla extract
  • 2 large eggs
  • 1 cup semi sweet chocolate chips
  • 30 caramel hershey kisses; unwrapped
PREHEAT oven to 325° F.

COMBINE flour, cocoa, baking soda and salt in small bowl. Beat butter, granulated sugar, brown sugar and vanilla extract in large mixer bowl until creamy. Add eggs, one at a time, beating well after each addition. Gradually beat in flour mixture. Stir in chips. (Refrigerate dough for ~1hour).  Scoop dough and press kiss into dough. Mold dough around the kiss so, the kiss is covered.  Roll the ball to completely cover kiss and give dough a round ball shape.  May need to flour your hands a bit as dough gets a little sticky.  Place onto ungreased baking sheets lined with silpat.

BAKE for 11 to 13 minutes or until cookies are puffed. Cool on baking sheets for 2-4 minutes; remove to wire racks to cool completely.

Monday, February 21, 2011

swiss fondue


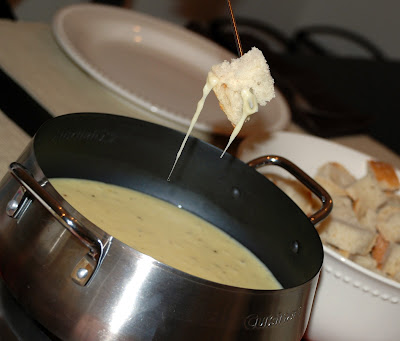
Fondue is fun.  Fondue is yummy.  Fondue is great with a big group when it is cold outside.  All of these facts logically lead us to host our first annual February Family Fundue night.  We invited my family up from San Diego on a rainy February night for a fondue feast.  We roasted up a ton of vegetables, roasted some chicken and cut up crusty bread and tucked into one plus pound of melted gooey cheesy delight.  This fondue is very flavorful but, mild in the sense that kids can enjoy the cheese as well as adults.  After the pot of cheese was devoured we tackled a pound of wonderful chocolate fondue.  Fun family night.

swiss fondue
adapted: bhg

1 garlic clove halved
1 1/2 cup dry white wine (sauvignon blanc)
13 oz gruyere cheese, grated (~4 cups)
13 oz emmental cheese, grated (~4 cups)
2 tablespoons flour
2 tablespoons kirsch
ground black or white pepper

Rub cut side of garlic on inside of fondue pot.  Pour in wine and bring to a boil on top of the stove.  Reduce the heat to a simmer. 

Put grated cheese in a bowl and toss with flour. Gradually add the cheese to the wine, stirring constantly, letting each addition melt into the wine.  When the mixture is creamy and smooth add kirsch and pepper to taste.  Transfer pot to tabletop and enjoy immediately.

Dip ideas: crusty bread, chicken, fingerling potatoes, green apples and roasted vegetables (broccoli, asparagus, cauliflower, brussel sprouts, carrots, mushrooms and zucchini).

Thursday, February 17, 2011

sticky toffee pudding


There are very few foods that I literally remember my first bite but, my first encounter with sticky toffee pudding is a very fond memory.  I used to travel to the UK for work and many nights I would spend alone in my hotel.  I was staying in the oh so posh Balmoral hotel in Scotland and I went downstairs in the late afternoon for some tea and a sweet.  I brought my book with me and I looked over the menu was not all that familiar with many of the items listed but, I like toffee so, I gave this sticky toffee pudding a go.  When this moist little cake arrived sitting in a puddle of toffee sauce and smothered with more all over the top and sides I was intrigued.  I cut open the warm cake and put the fork into my mouth.  I think the entire dining room may have heard my audible "mmmm oh my god mmmm yum"!  It was that good.  I basically was licking the plate.  I was so sad I shared this moment alone because I wanted to talk about it, relive it and do it all over again.  At this point in my life I had no interest in cooking or baking so, I left my fond memory behind.  Years later Brad and I were in Vail and there on the menu sticky toffee pudding.  I was so excited.  I talked up the dessert and was hoping that I would not over hype it and then it would disappoint.  It arrived and we immediately tucked into it and boy it did not disappoint.  We were now both in love with sticky toffee pudding.  This dessert will always have my heart and as of now it is in my top three desserts of all time.  I can't imagine what will push this piece of heaven on a plate off my list.  I always scan dessert menus in hopes that sticky toffee pudding and I will meet again.

sticky toffee pudding
source: sticky chewy messy gooey

Cake:
2 cups pitted dates (about 12 ounces), preferably medjool, chopped
1½ cups water
1¼ teaspoons baking soda, divided
2 cups all-purpose fl our
½ teaspoon salt
1 teaspoon baking powder
¾ cup (1½ sticks) unsalted butter, at room temperature
1½ cups firmly packed light brown sugar
3 large eggs
1 teaspoon pure vanilla extract

Toffee Sauce:
1 cup (2 sticks) unsalted butter
3 cups firmly packed dark brown sugar
2 cups heavy cream
1 teaspoon pure vanilla extract
¼ teaspoon salt

Vanilla ice cream for serving

Lightly butter a standard 12-cup muffin tin or spray with nonstick cooking spray. Position a rack in the middle of the oven and preheat to 350°F.

Combine the dates and water in a heavy-bottomed saucepan. Bring to a gentle boil. Reduce the heat to a simmer, and cook, uncovered, until the dates are softened and have absorbed the water. Remove from the heat and stir in 1 teaspoon of the baking soda. Let stand for about 20 minutes.

While the dates are soaking, sift together the flour, salt, remaining ¼ teaspoon baking soda, and the baking powder into a bowl. Set aside.

In another bowl, beat together the butter and brown sugar until light and fluffy. Beat in the eggs, one at a time, beating well after each addition, and then beat in the vanilla. Stir the dates and any soaking liquid into the batter. Gently fold the dry ingredients into the wet batter just until combined.

Fill the muffin cups two-thirds full. Bake until a wooden skewer inserted in the center of a cake comes out clean, 22 to 28 minutes.

Meanwhile, make the toffee sauce: Combine the butter and brown sugar in a saucepan over medium heat. Cook until the sugar and butter melt together. Add the cream, vanilla, and salt. Increase the heat to high and bring to a boil. Reduce the heat to a simmer and cook, stirring frequently, until the sauce thickens, 6 to 8 minutes.

Remove the cakes from the oven and poke the top of each a few times with a wooden skewer. Drizzle 1 tablespoon of the warm sauce over each cake and allow it to sink in completely.
** Cakes can be made up to 24 hours in advance.  If making cakes ahead of time.  Preheat over to 350.  Put 1 tablespoon of sauce in the bottom of each muffin cup and place the cake back in.  Put muffin tin back in the over for 5 minutes.  While the cakes are heating place a tablespoon of warm sauce on each plate.  When the cakes are reheated turn them out muffin top down so, the reheated toffee sauce runs down the sides of the cake. 
** Serve with ice cream.

Tuesday, February 15, 2011

queso de cabra al horno

Spanish supper club.  Think sangria, empanadas, paella, potatoes, mushrooms, almond cake and more and more sangria.  My neighbor Erin hosted this month and as expected she made the night so special and her decor was over the top.  She has this amazing ability to truly transform a room into the theme of the evening.  She sent us some links to spanish tapas menus and I originally thought I wanted to do a dish with manchengo and serrano ham but, then when I saw this bubbling, gooey goat cheese mound surrounded by tomatoes I was hooked.  This appetizer is so easy to throw together and really is delicious.  I am a sucker for melted cheese and crusty bread.  Tapas are my type of meal because I love lots of bites of little dishes.  Everything was really good and some how the meal came together perfectly again.   The sangria got us a bit rowdy and of course the conversation got crazy and loud. We had some really exciting things to celebrate and it was so fun to be with this group of friends.  They all really embrace life.   I am fairly certain we may have traumatized Erin's kids and husband with our silly antics and banter.  I walked home well after 2:00 in the morning with Erin laughing and chasing me down the street ... fairly certain that is a sign of way too much fun had.

queso de cabra al horno (baked goat cheese)

1 tablespoon chopped garlic (~2-3 cloves)
1 tablespoon extra virgin olive oil
1 lbs crushed ripe tomatoes (canned)
1 tablespoon dried italian seasoning
1 teaspoon sherry vinegar
1 teaspoon sugar
½ teaspoon salt
1/4 tsp black pepper
8 oz goat cheese, room temperature
fresh parsley for garnish
crusty baguette (warmed and slice) 

In a medium sauce pan, over low heat, saute the garlic in olive oil. Add the sherry vinegar and the crushed tomatoes.
Bring the tomato mixture to a simmer and add the sugar and dried italian seasoning.
Simmer the tomato sauce about 5 minutes and season it with the salt and pepper.  Set aside.

Form the goat’s cheese into an even sized disk shape.  Put the disk of cheese in the center of souffle dish.
Spoon the sauce around the disk of cheese careful not to cover the cheese.
Bake at 425 degrees (~25-30) until the sauce is bubbling hot and the goat’s cheese in browned and softened.  Last 10 minutes warm bread in oven.
Serve with sliced crusty baguettes or your favorite dipping bread. 
* Can warm bread with olive oil and garlic. 


Monday, February 14, 2011

candy bar shortbread cookie bites


I wanted to make a small festive Valentine's Day treat for the kids tonight.  I had some Valentine's M&Ms left and sadly some snickers bars from ummm ... gulp Halloween.  The shortbread base is really sturdy and very tasty.  In my mind you can't go wrong with butter and brown sugar.  The snickers bars stuck much better to the base and actually looked better as well.  The M&Ms were festive and the kids gravitated toward that flavor but, they seemed to fall apart a bit easier.  I cut these into small bite size pieces and they the perfect size because these are very sweet.  I am always looking for good ways to use up left over candy and this definitely works as it can be customized to what you have on hand. My extremely talented in all ways neighbor delivered some Valentine's baked goods left from her daughters 6th vintage Valentine birthday party (swoon) which made my sweet treat plate look over the top special tonight.  Happy heart day.  XOXO

candy bar shortbread cookie bites
source: everyday food

2 sticks salted butter, softened
3/4 cup light brown sugar
2 cups flour
1 cup semi-sweet chocolate chips
12 oz favorite candy bars, chopped (~2 cups)


Preheat oven to 350. Prepare an 8 inch baking pan. Cream butter and light brown sugar and salt about 3 minutes. Once creamed, add in flour in 3 additions, blending well in between each addition. (It will be a bit crumbly).

Add to prepared pan by pressing down and spreading out dough.  Bake for 30-35 minutes (until golden brown and firm). Add chocolate chips on top and place back into oven for one more minute. Take out of oven and with an offset spatula, smooth out the melted chocolate chips. Add candy bar pieces and let cool on wire rack for 30 minutes. Then pop into fridge to firm up chocolate and candy for about 5 minutes.  Cut into bite size pieces.

Friday, February 11, 2011

frozen honey cream


I love going to the farmers market on the weekends but, my family does not seem to enjoy this quite as much.  Boo.  I have found that I can entice or possibly bribe my 4 year old with a visit to the honey stand.  He can taste honey, get a honey stick and get a cute little bear filled with the honey flavor of his choice.  He is a true honey fan.  He recently picked out orange blossom honey in which I used in this beyond easy frozen honey cream.   My kids absolutely LOVED this and it is a great use of extra egg yolks which I always seem to have on hand.   It was gone in a few days.  It has an extremely intense honey flavor which was too much for the hubby but, not either kid.  I like these kind of frozen desserts because a very small portion goes a long way and it is hard to over indulge when it is so sweet and creamy.

frozen honey cream
source: everyday food
  • 1 3/4 cups cold heavy cream
  • 2/3 cup wildflower or orange blossom honey
  • 4 large egg yolks

Directions

  1. In a medium bowl, using an electric mixer, beat heavy cream to stiff peaks, then refrigerate. In a small pot, bring honey to a boil over medium-high and cook 2 minutes. In another medium bowl, using mixer, beat egg yolks until pale yellow. With mixer running, add hot honey in a slow, steady stream. Beat on high until mixture has cooled to room temperature, about 5 minutes. With a rubber spatula, fold in whipped cream. Transfer mixture to a 5-by-10-inch loaf pan. Cover with plastic wrap. Freeze until set, 2 hours (or up to 1 week).

Wednesday, February 9, 2011

carrot cake oatmeal


Carrot cake is one of my favorite desserts and as you know oatmeal is a breakfast ritual so, when my basket arrived with a bunch of beautiful nantes carrots I knew I had to combine the my two loves and the carrot cake lovechild was born.  The combination of carrot and coconut mixed with pie spices is the perfect way to start off a cold morning.  If you like carrot cake you will love no seriously go nuts for this bowl of oats.  This is a good base which I think can be jazzed or changed up with banana, mangos, walnuts or even a little oatmeal "icing" made out of greek yogurt and maple syrup.  I hope I get more nantes this week because I am going to have fun playing around with this combination.
 
carrot cake oatmeal

1/2 cup oats
1/2 cup water
1/2 cup unsweetened coconut milk
1 egg white
2 small or 1 large carrot; grated
1 teaspoons of brown sugar
1/4 tsp pumpkin pie spice
good sprinkle of ground flax seed meal
1 tablespoon shredded coconut

Combine the oats, water and coconut milk.  Cover the bowl with plastic wrap and put in the refrigerator over night.  If you don't have time to do over night then do it in the morning and let it sit.  This allows the oats to soak up the liquid and produce the most voluminous and creamy bowl of oatmeal.  Remove wrap and add egg white, grated carrot, brown sugar, pumpkin pie and flax meal and give a good stir.  Either cook bowl or stove top or put in microwave for ~4 minutes stirring half way through.  Top with shredded coconut.  Enjoy! 

Tuesday, February 8, 2011

red velvet brownies


I saw these brownies in the December issue of Southern Living and I wanted to make them for Christmas but, I just never had the opportunity.  I clipped out the recipe and I held on to it knowing it would be a perfect Valentine's Day treat.  We did not really celebrate Valentine's Day when it was just the two of us but, now that we have the kids it gives new meaning to the holiday.  We can get fun and corny with it and exchange little tokens of love.   I have been explaining to Carter that red, pink, hearts, cupids, flowers, love etc. are all associated with Valentine's Day.  These brownies are the perfect way to kick off the celebration and let the kids help in the kitchen.  They are a spin on the oh so popular red velvet Valentine's day cake.  They were such a treat tonight for the kids and apparently they are a treat that keeps on giving back because I am finding red velvet crumbs all over the house.  Red velvet is fun to eat, pretty to look at but, not so fun to get out of the carpet.  Maybe it is payback from the brownies for being so easy to make.  The brownies mix up in one bowl.  They are thick and moist with a cake like texture. The cream cheese frosting compliments the base perfectly and I think white chocolate curls on top would take these to a new level of decadence.  These are so simple there is no reason not to make a Valentine's batch for your sweetie(s).

red velvet brownies
source: southern living
  • 1  (4-oz.) bittersweet chocolate baking bar, chopped
  • 3/4  cup  butter
  • 2  cups  sugar
  • 4  large eggs
  • 1 1/2  cups  all-purpose flour
  • 1  (1-oz.) bottle red liquid food coloring
  • 1 1/2  teaspoons  baking powder
  • 1  teaspoon  vanilla extract
  • 1/8  teaspoon  salt
1. Preheat oven to 350°. Line bottom and sides of a 9-inch square pan with aluminum foil, allowing 2 to 3 inches to extend over sides; lightly grease foil.
2. Microwave chocolate and butter in a large microwave-safe bowl at HIGH 1 1/2 to 2 minutes or until melted and smooth, stirring at 30-second intervals. Whisk in sugar. Add eggs, 1 at a time, whisking just until blended after each addition. Gently stir in flour and next 4 ingredients. Pour mixture into prepared pan.
3. Bake at 350° for 44 to 48 minutes or until a wooden pick inserted in center comes out with a few moist crumbs. Cool completely on a wire rack (about 2 hours).
4. Lift brownies from pan, using foil sides as handles; gently remove foil. Spread cream cheese frosting on top of brownies, and cut into 16 squares. Garnish with white chocolate curls or sprinkles, if desired.
 

cream cheese frosting
source: southern living
  • 1  (8-oz.) package cream cheese, softened
  • 3  tablespoons  butter, softened
  • 1 1/2  cups  powdered sugar
  • 1  teaspoon  vanilla extract
Beat cream cheese and butter at medium speed with an electric mixer until creamy. Gradually add powdered sugar and salt, beating until blended. Stir in vanilla.

Monday, February 7, 2011

south of the border mason-dixon dip


We went to our annual super bowl party hosted by our good friends yesterday.  I arrived not knowing who was even playing.  I left not knowing who won.  What I do know is we had a blast and I feel ill today.  I blame this dip, Paula Deen and my lack of self control.  I am not to be left alone in a room with dip and chips.  This dip comes together in minutes and can hardly be deemed cooking rather opening cans and wrappers, dumping, mixing and heating.  Once you set it out it will be gone in minutes as well.  It is best right when it comes out of the oven and it is hot and bubbly with delicious gooey cheese.  I am a dip girl and I am not going to deny this but, I am so so thankful that super bowl Sunday only comes one time a year. 

south of the border mason-dixon dip
adapted: paula dean

2 15oz cans vegetarian chili
2 8oz packages reduced fat cream cheese
2 cups grated cheddar cheese
3 green onions, chopped


Preheat oven to 350 degrees. Heat chili in a saucepan over medium heat for 5 minutes.  Turn down to low and add blocks of cream cheese.  Mix until cream cheese is melted. Pour heated chili in 1.5 quart casserole dish and sprinkle grated cheese over top. Bake for approximately 20 minutes, until mixture is hot and bubbly. Remove from oven and top with chopped green onion tops. Serve immediately with tortilla chips or fritos.

Friday, February 4, 2011

grapefruit buttermilk sherbet


My in-laws have a home in palm dessert.  We are super lucky and get to go out and enjoy the sun and pool often.  This time of year the citrus trees in their community are bulging with fruit.  I asked my mother in law if it was ok to pick some fruit.  She said yes, they actually encourage people to pick the food for the local food bank.  That is awesome I said.  I wrangled up the kids, got bags and we took off in the golf cart.  We stopped at the first tangerine tree and started to load up bags.  At the same time a man in a red security golf cart approached and told us it was prohibited to pick the fruit.  What?!?  My four year old Carter thought this security guard was the police and got scared he was going to take me away.  Ever since this day Carter continually asks me if the man in the red cart is going to tell me I am naughty.  LOL.  I could not believe we did not get to the grapefruit trees.  I ate my weight in grapefruits when pregnant with Campbell so, I have not had many in the past 18 months.  I did not want the kids to see me a s a rule breaker but, as soon as dusk hit I sent Brad out to get me some grapefruits.  I think he flashed back to how many I ate while I was pregnant and came back with two enormous bags of red grapefruits.  Wow!  I immediately began to juice and made two pitchers of greyhounds for cocktail hour.  They were divine.  The remainder of the hot grapefruits came home with us.  I have to have dessert every night but, I am trying to have some lighter desserts peppered in to offset things like snickerdoodle cupcakes.  This sherbet is light, tangy and tart.  If you like tart frozen yogurt this would be up your alley.  If you are not a fan of tart pass.  This has less then 150 calories a serving and a small scoop does satisfy.  After I had this churning I got curious what the difference between sherbet and sorbet was.  I would have classified this as a sorbet but, I discovered with a quick google that sherbet has dairy whereas sorbet does not.  The vodak helps to not allow the sherbet to freeze solid.  It does not add taste but, provides a creamy scoopable texture.

grapefruit buttermilk sherbet
source: cooking light
  • 1  cup  water
  • 2  tablespoons  finely chopped red grapefruit rind
  • 1  cup  sugar
  • 1  cup  fresh red grapefruit juice
  • 2  cups  whole buttermilk
  • 2  tablespoons  vodka
1. Bring 1 cup water to a boil in a small saucepan. Add rind to pan; reduce heat, and simmer for 2 minutes. Drain, reserving rind. Combine rind, sugar, and juice in pan; bring to a boil, stirring constantly until sugar dissolves. Reduce heat, and simmer 20 minutes. Remove from heat; pour into a bowl. Chill for 1 hour. Strain juice mixture, and discard solids. Combine the juice mixture, buttermilk, and vodka in the freezer can of an ice-cream freezer; freeze according to manufacturer's instructions.

Thursday, February 3, 2011

korean beef skewers and noodles


We have really cut down on the amount of meat we eat in our house.  When I say we I mean me and in turn that means the rest of the hungry mouths in this home are also reducing their meat consumption. No one is complaining.  We all like red meat but, now only eat it on occasion.  If we are going to indulge in some meat why not have it thinly sliced, covered in a spicy sweet Asian marinade and stuck on a stick.  Every time I thread skewers I think of the line in Something About Mary when she comments there really are not enough meats on sticks.  I agree! I love a kabob, skewer, or even an occasional hot dog on a stick with a gallon of lemonade.  We threw these on the barbecue all summer and they are always a hit but, work equally as well on a grill pan indoors.  The noodles tossed in the cooked off marinade could not be easier and are a perfect side dish.  I prefer it with rice noodles but, the kids will eat fettuccine so, I have been swapping out the rice noodles.  This is a quick and easy meal to get on the table and would work well as the base of a beef stir fry as well.

korean beef skewers and noodles
adapted: cooking light
  • 6  tablespoons  less-sodium soy sauce
  • 1/3  cup  sugar
  • 1 1/2  tablespoons  sambal oelek
  • 1  tablespoon  canola oil
  • 1  tablespoon  fresh lime juice
  • 4  garlic cloves, minced
  • 1  (1-pound) tri-tip steak, sliced against the grain into thin strips
  • 1/3  cup  water
  • 8  ounces  wide rice sticks or fettuccine
  • 3  tablespoons  thinly sliced green onions
1. Prepare grill to medium-high heat or heat indoor grill pan over medium high heat.
2. Combine first 6 ingredients in a zip-top bag. Add beef to bag; seal. Marinate at room temperature for 30 minutes, turning once. Remove steak from bag; reserve marinade. Thread steak evenly onto 8 (8-inch) skewers. Grill 3 minutes on each side or until desired degree of doneness. 
3. Combine reserved marinade and water in a small saucepan; bring to a boil. Cook 1 minute.
3. Soak rice noodles in boiling water until tender; drain. If using fettuccine cook per package and drain.  Add noodles to hot marinade and toss to coat and sprinkle with onions. Serve with skewers.

Wednesday, February 2, 2011

cake pops


Cake pops are nothing new.  Bakerella has made the cake pop spread around the blogsphere like wild fire.  If you have not seen her cake pop creations go take a look.  She is amazing.  Although she makes fancy cake pops you can make the basic version below and obtain the same great tasting result.  You can use homemade cake and frosting but, for large batches I go to cake mix and frosting from the store.  I often have cake scraps and frosting left over which allows me to make a handful of cake balls to have on hand.  My kids go NUTS for these.  I choose the pink on pink cake pops for a pink dessert bar at a sip and see we hosted this weekend.  They may have been the easiest dessert I made on the table but, they were also the cutest.  They brought a little whimsy to the table.


cake pops
source: bakerella

cake pop or cake balls
1 box cake mix - any flavor (used strawberry)
1 can frosting (16 oz.) - any flavor (used cream cheese)
1 package bark or candy melts (used pink candy melts)
lollipop sticks (cake pops)
styrofoam block (cake pops)
wax paper

1. Cook cake following the directions on the box for 9x13 cake.  Remove cake from oven and let cool completely.
2. After cake is cooked and cooled completely, crumble into large bowl. Mix thoroughly with one can of frosting. It is messy but, using hands gets good results.
3. Roll mixture into balls and lay on cookie sheet. I used my cookie dough scoop and then rolled with hands and got ~40 balls. If making cake pops stick lollipop stick into ball.
4. Chill or freeze for several hours.
5. Melt chocolate in microwave per directions on package.  The candy melts harden up quickly so I melt half the bag dip and then start on the other half of bag.
6. Dip balls in chocolate resting on a fork so, chocolate can drip off through the tines.  Lay on wax paper if making cake balls until firm.  For cake pop tap off excess chocolate and then stab pop into styrofoam block.
Decorate either with sprinkles if desired.

Tuesday, February 1, 2011

zucchini bread oatmeal


Zucchini arrived in our csa box last week.  It is not zucchini season or so I thought so, I was a bit surprised by this.  I wasn't prepared with thoughts of ways to use up zucchini.  I made a delicious loaf of zucchini quick bread which was devoured in under two days.  I was still craving zucchini bread but, only had one small zucchini left.  I came up with another way to enjoy my morning oatmeal when I turned regular oats into a delicious bowl of zucchini bread oats.  I wasn't sure how it would taste but, it was so good!  The egg white helped bind it together and made it really puffy and creamy.  I have never been so excited for zucchini season.
 

zucchini bread oatmeal

1/2 cup oats
1/2 cup water
1/2 cup unsweetened vanilla almond milk
1 egg white
1small zucchini; grated
1 teaspoons of brown sugar
1/8 tsp cinnamon
good sprinkle of ground flax seed meal

Combine the oats, water and almond milk.  Cover the bowl with plastic wrap and put in the refrigerator over night.  If you don't have time to do over night then do it in the morning and let it sit.  This allows the oats to soak up the liquid and produce the most voluminous and creamy bowl of oatmeal.  Remove wrap and add egg white, grated zucchini, brown sugar, cinnamon and flax meal and give a good stir.  Either cook bowl or stove top or put in microwave for ~4 minutes stirring half way through.  Enjoy! 
Related Posts with Thumbnails
 
BLOG DESIGN BY: SHERBET BLOSSOM DESIGNS